Guide to Climbing Mount St. Helens During Peak Season
Hike to the edge of Mount St. Helen’s crater in the summer months and you’ll be able to see the active volcano steaming! It’s a strenuous climb with unusual terrain, but there no technical skills required to summit. If you can hike long distances, you can climb this volcano!
Know what you’re looking for? Click below to skip to a section.
Disclosure: This post includes affiliate links with recommended lodging recommendations and hiking gear. We’ll receive a small portion of that sale if you click through and reserve lodging or purchase a product. You won’t be charged more, and we haven’t been paid by any of these retailers to share their information. These are all our genuine preferences.
Trail statistics
Trail: Ptarmigan Trail
Trail description: Washington Trails/Alltrails
Miles: 10 miles, roundtrip
Elevation gain: 4,500 feet
Highest point: 8,365 feet
Difficulty: Hard
Length of Time: 7 to 12 hours
Permits
Climbing permits are required year-round. Between July and September (when we advise to climb), there is a limit of 110 climbers per day. Permits can be purchased one month in advance on the first of the month here.
Purchasing permits is competitive. We recommend having a login on recreation.gov made in advance. On the first of the month, sign in shortly before 7:00 am when permits go live. Refresh your browser at 7:00 am, fill in the amount of group members you’d like to have on your permit, and select your preferred date as quickly as you can. Have other group members do this as well to better your odds of getting permits.
Weekend dates tend to sell out within the first few minutes of being live. If you don’t get a weekend date on the first try, they’ll likely sold out by the time you try for a second date. Weekdays tend to be less competitive.
Permits are $15, with a $6 processing fee. The max party size is 12, and permits are non-transferable. Whoever purchases the permit is considered the permit holder and all others in their group are considered group members. You can change the names of your group members up to seven days before your climb. However, the permit holder name cannot be changed, and they must climb with the group.
If you have group members choose not to hike, you can change your group size up to two days before your climb (you’ll only get a refund if you cancel permits seven or more days before your climb). To add more to your group (keeping your numbers under 12) you can purchase tickets that have been returned through recreation.gov only. Once a ticket is returned, it will show up on recreation.gov within 24 hours so it’s worth checking daily.
You can only print or download your permits once, so do this when your group members are finalized. Carry a copy of your permit and a valid ID. The names on the permit must match the IDs of the climbers.

Best time to hike
Mid-July to September
There is no technical climbing experience needed to hike Mount St. Helens between mid-July and September. If you hike in July or August, you’ll want to start early (around sunrise) to avoid the hottest parts of the day. You’ll also have higher chances of having clear skies and great views than if you were to hike here in the fall. However, since the weather is more predictable during these months, permits in the summer months are more competitive to get than the fall.
We’ve climbed twice in September and once in August. Our first attempt in September was cold, and windy, with snow and poor visibility (we chose not to summit). Our climb in August was hot but clear — we saw five volcanos from the summit! Our third climb in September was cloudy, and we didn’t have good views, but it was otherwise pleasant.
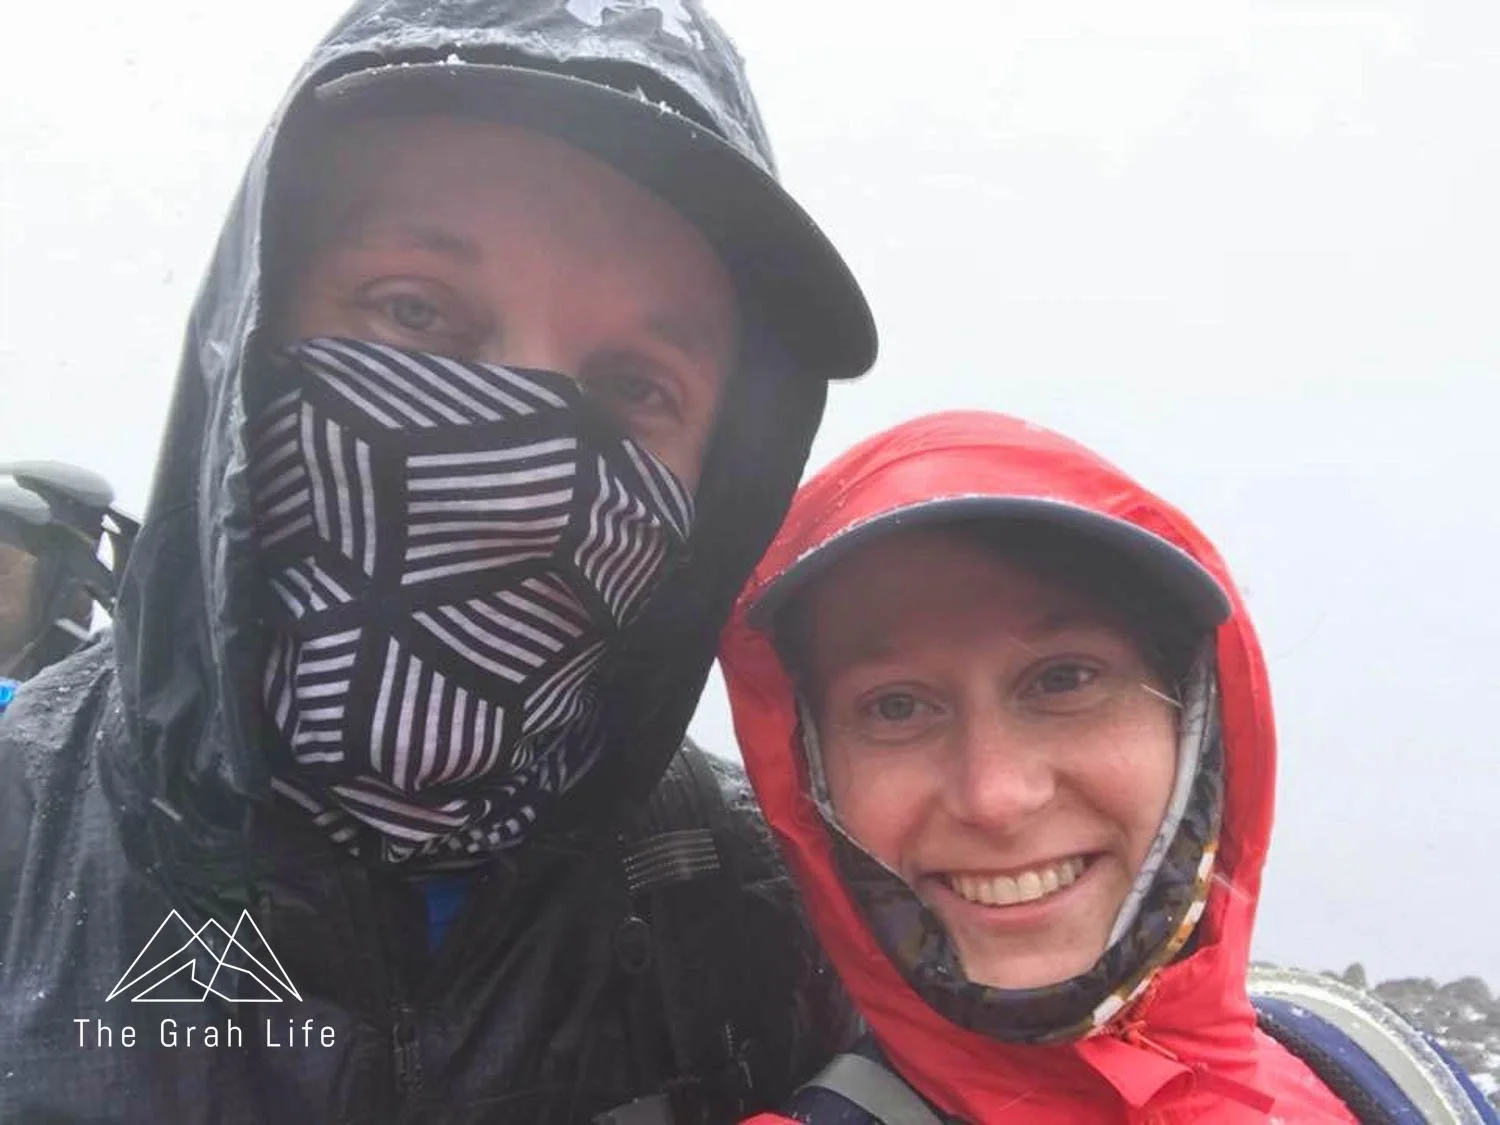
Our turn around point in September 2017

Summit in August 2019

Summit in September 2022

Parking passes
You’ll need an America the Beautiful Pass OR Northwest Forest Pass to park at the Climber’s Bivouac (the trailhead). Neither are sold at the trailhead, but you can purchase them online or in person at Lone Fir Resort.
The climb
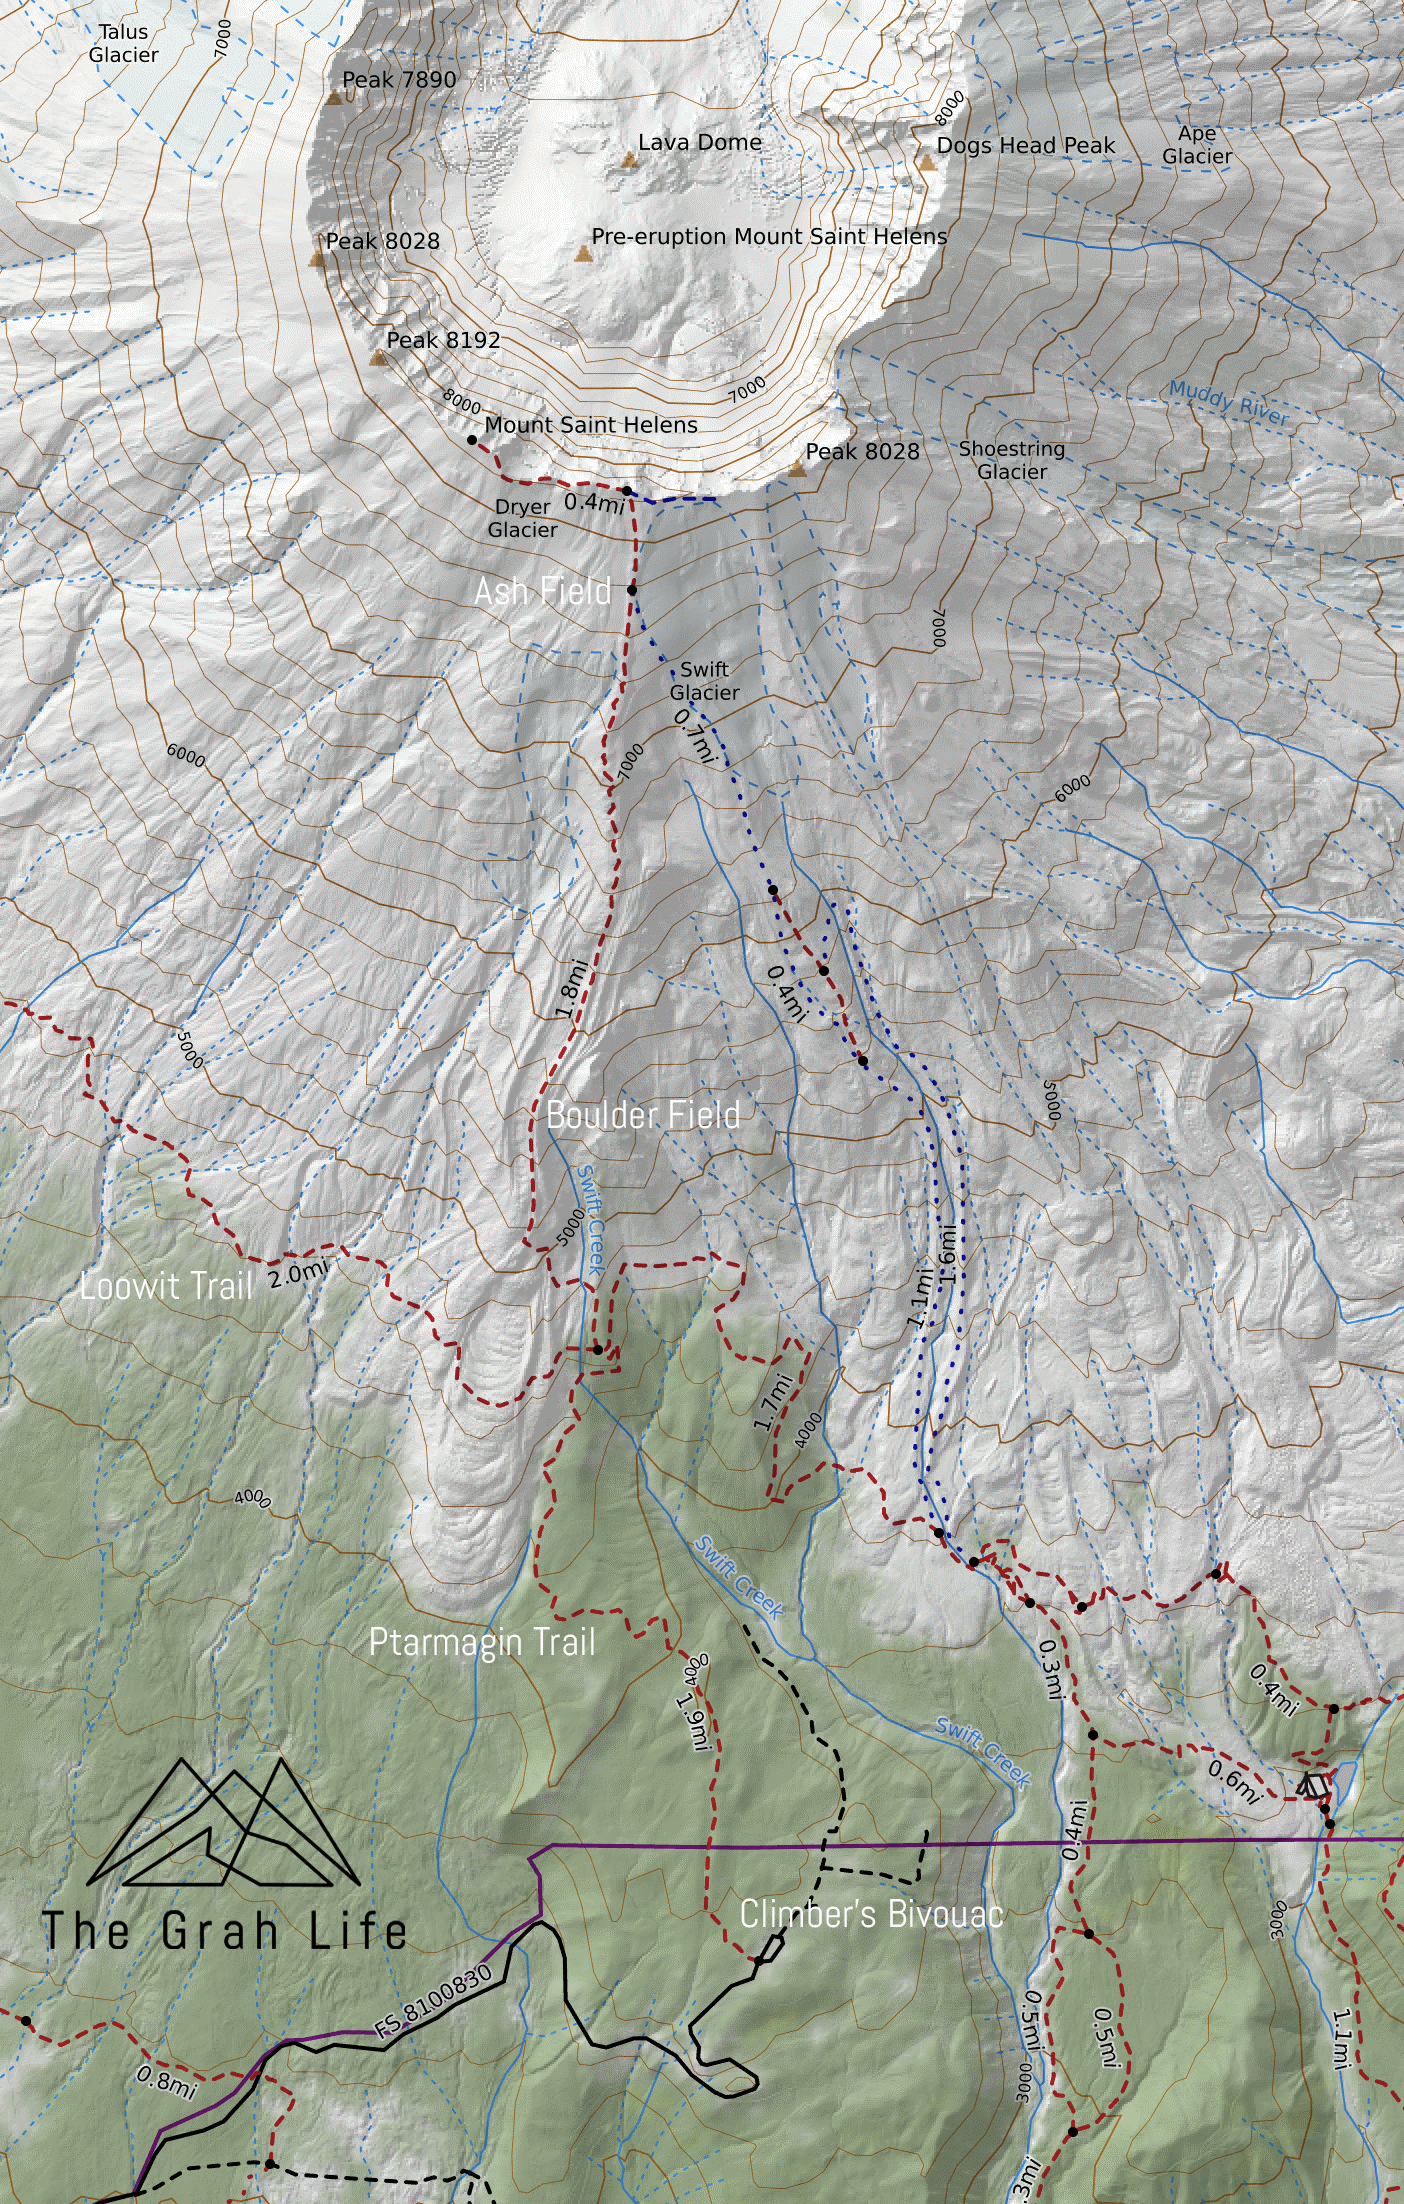
The forest
In the first 2.1 miles of trail, you’ll gain 1,000 feet as you walk through the trail in the forest. Just before you reach the edge of the forest, you’ll cross paths with the Loowit Trail. Look for a sign that points to a pit toilet. This will be the last spot to use the restroom and have privacy!
As the forest ends and the boulder field begins, pay attention to where you enter the boulder field. On the return trip, it’s very easy to get lost here. Each time we’ve climbed, we’ve exited the boulder field at wrong points and had to wander spur trails to find the correct trail back in the forest.
Once you leave the forest, the trail is completely exposed. Start early and bring good sun protection.
The boulder field
The boulder field is the toughest part of this climb. You’ll be gaining 2,500 feet of elevation by climbing over and around large boulders for approximately two miles. It’s the unusual motions, like taking large steps and pivoting climbing up boulders, that make this climb difficult.
There is no set trail here, so you’ll be route finding your way through the area, but there are large trail markers to keep you headed in the right direction. On a clear day, you should be able to stand at one trail marker and be able to spot the next one. If you’re not able to see the trail markers, use a GPS or map and compass to guide your way.

The trail marker
Although you will be route finding, there are three well-worn paths through the boulders. Once you’re about a half mile into the boulder field, you’ll notice the trail markers are at the tallest point of the boulder field with two faint trails of ash down below, on either side.
Staying in the middle of the boulders gives you the best sight of the trail markers, but you’ll also be making your way through the largest boulders. The trail off to the right is like the middle one, with more patches of ashy trail between boulders. We favor the trail to the left. It’s the lowest trail, with more ash than boulders, but the trail markers are hardest to view from here. It’s usually fastest to choose one trail and stick to it, but there are trails that go between the three.
Pay attention to the trail markers as you’re coming down the mountain as well. It’s especially easy to get off route after the weather station.
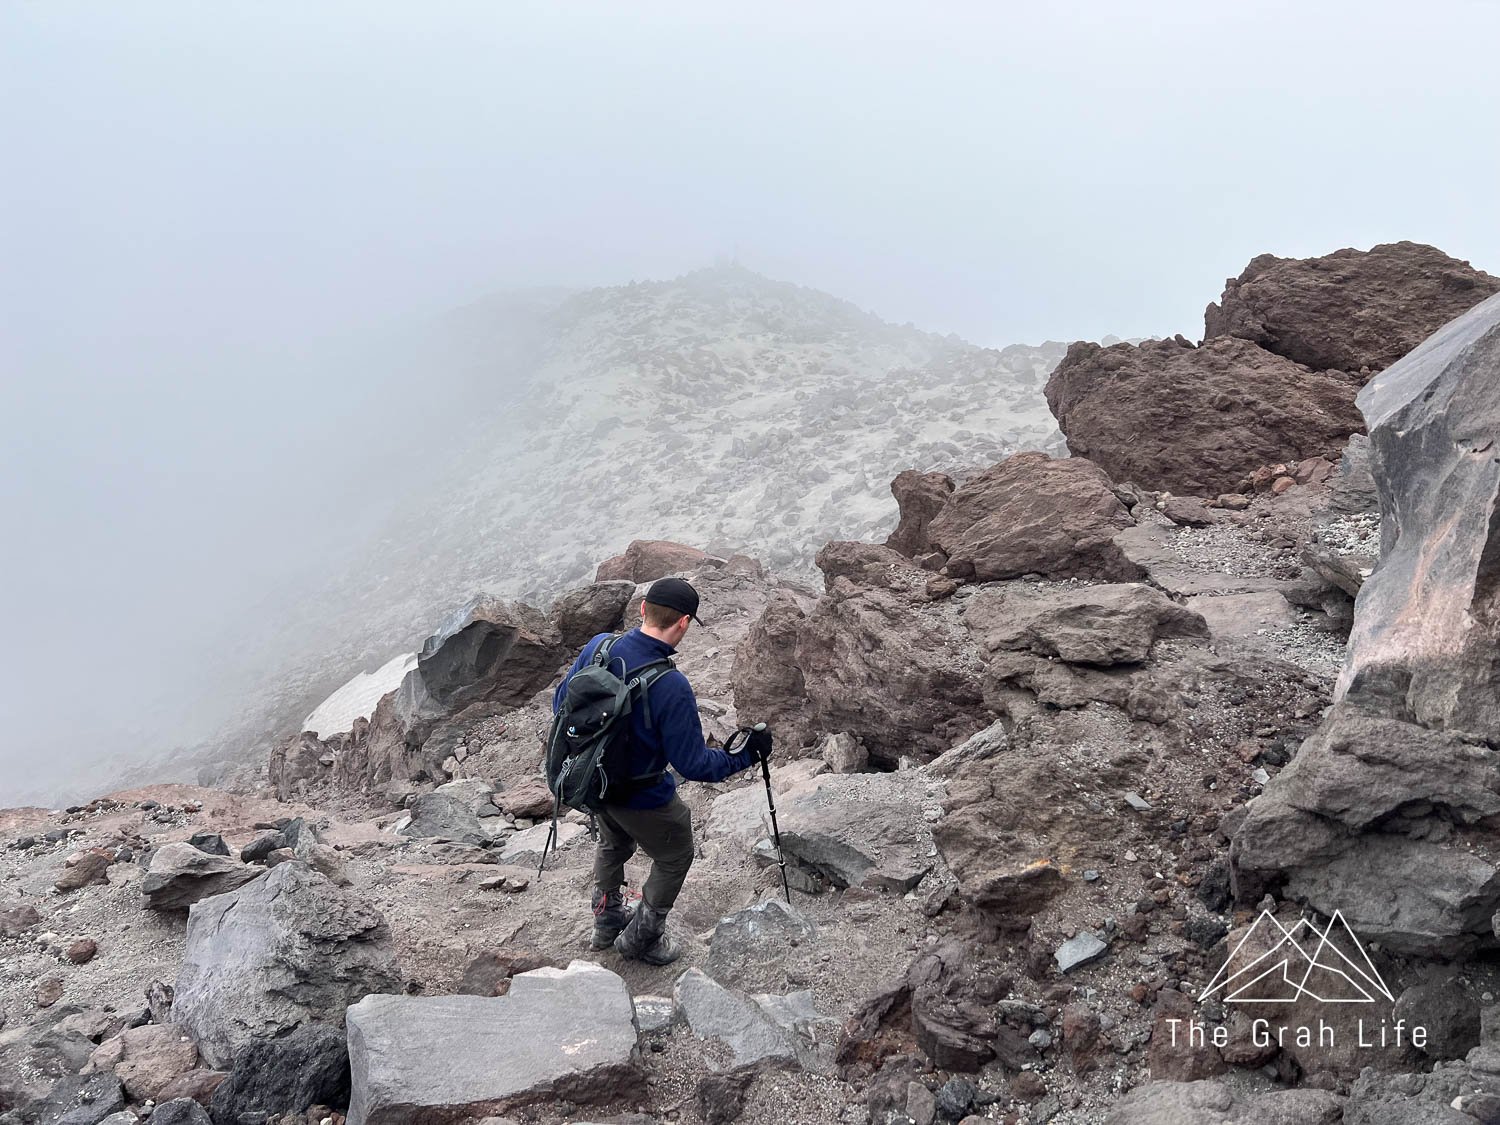
The ash field
Just as suddenly as the boulders started, they’ll end. Next, you’ll have a 1,000-foot climb in ash and small rocks for about a mile. Climbing here feels like you’re taking two steps forward and one step back. Keep pushing and be patient!
The summit
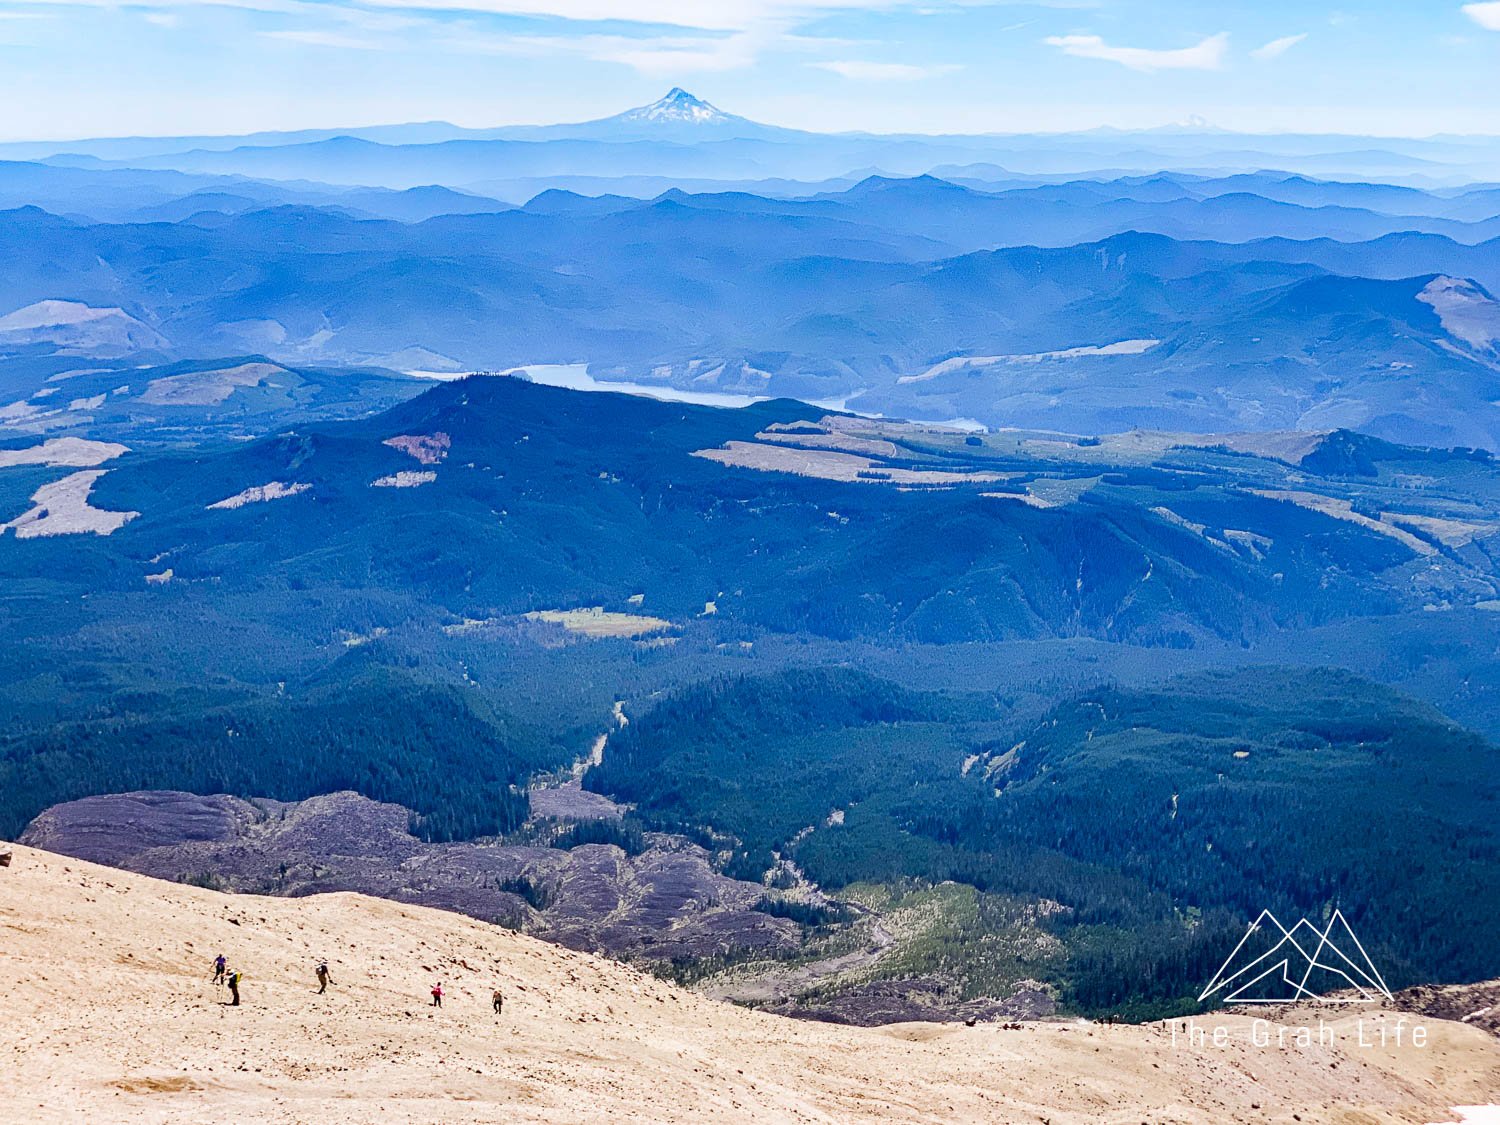
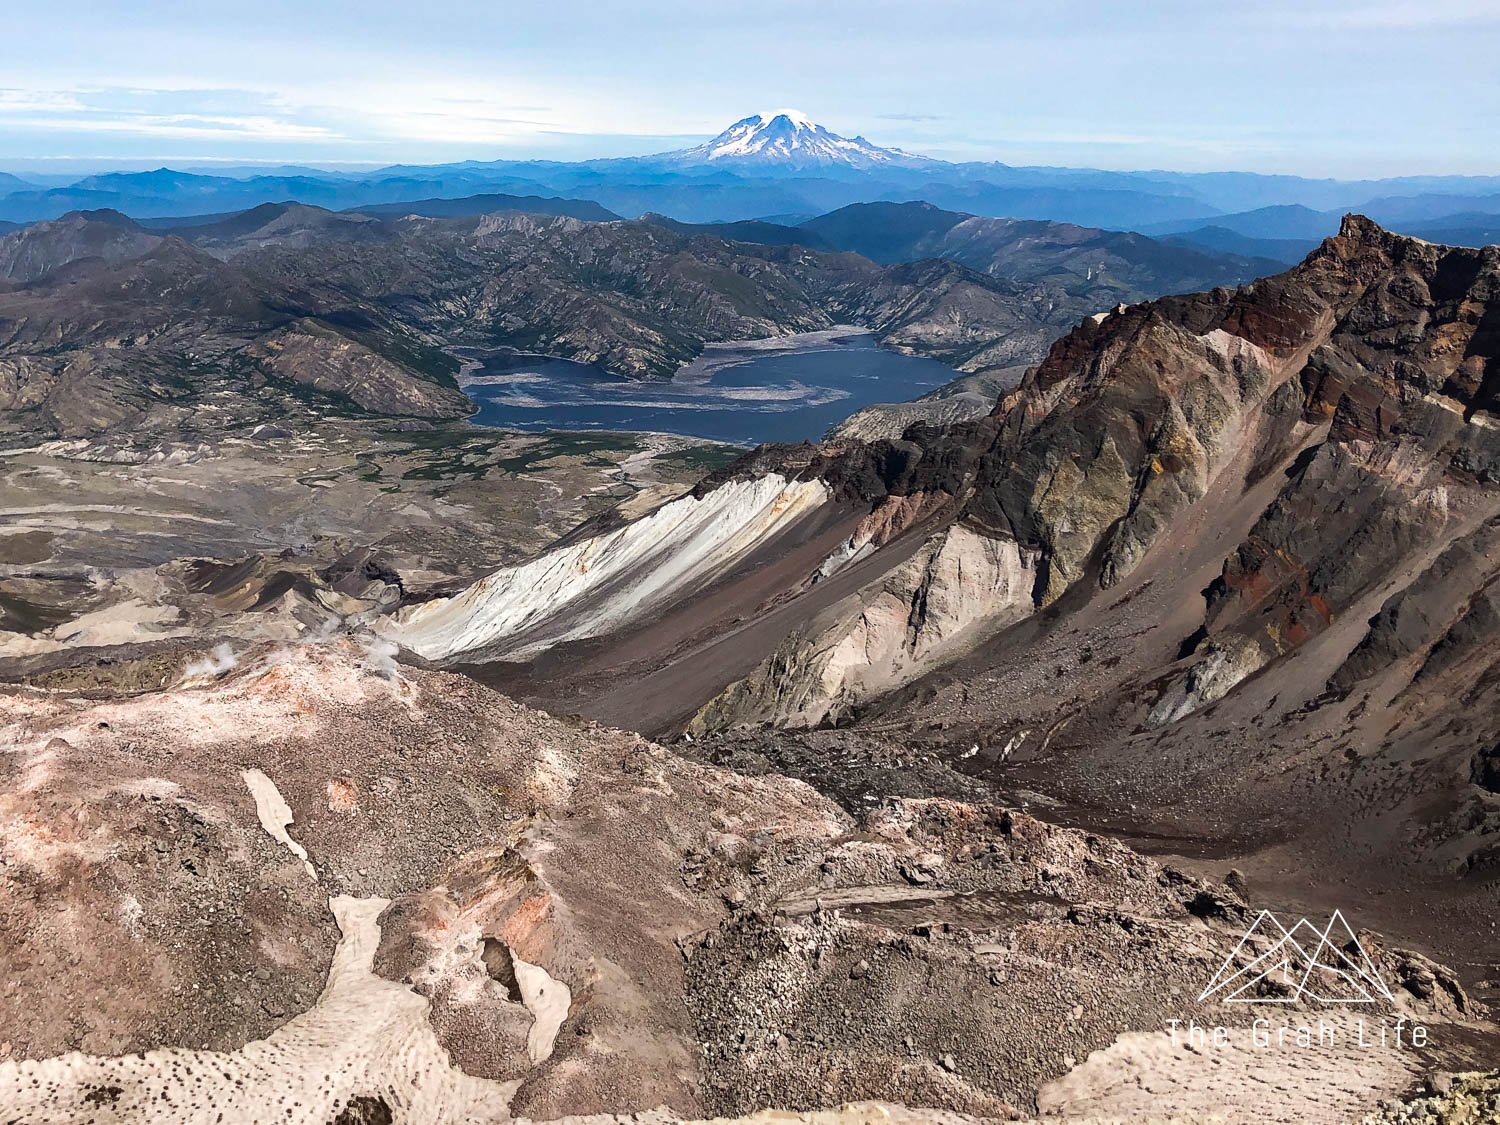
Finally, you’ll reach the summit! On a clear day, you’ll be able to see Mount Rainier, Mount Adams, Mount Hood, and Mount Jefferson from the top. Stay away from the edge of the summit — it’s a cornice and will collapse if there’s too much weight on it. We feel like this shouldn’t need to be said, but entering the crater is strictly forbidden.
When you gaze into the crater, look for steam, and check out the dome growing inside it and Washington’s newest glacier forming around it! Don’t worry about it erupting — the last eruption in 1980 was led by a series of earthquakes and predicted well in advance.
How difficult is the hike?
It’s hard! On average it takes 7-12 hours. Our first successful summit in 2019 took us 9 hours, and our last summit in 2022 took 8 after doing a much harder thru hike of the Enchantments two weeks prior. Its steep and the unusual terrain makes it more tiring than your average hike.

How fit do you need to be?
You need to be able to route find and hike up and down steep, uneven terrain and scree for 10 miles with a pack. When we summited in 2019, we’d hiked 6+ miles about 3 times per month for three months leading up to our climb. This would be the minimum amount of training we’d suggest.
Here’s a blog with more details on how to train to hike Mount St. Helens.

Staying hydrated
There is nowhere to get water at the trailhead or along the trail. The forest service suggests climbers carry a minimum of three liters of water per person. We both climb with our three-liter water bladders filled and stash a bottle in the trees just before the boulders start, which is common practice.
Once you’re out of the forest, the hike is completely exposed, so plan your water needs according to the weather forecast. When we summited in August, we finished our three-liter water bladders shortly before reaching our bottle stashed in the forest. When we summited in September, we did not end up needing the extra water.
You’ll also need to replace the salts and electrolytes you’ll be losing. Eating salty snacks won’t be enough to prevent hypernatremia, so we take salt pills hourly. We also leave Nuun tablets in our car to help rehydrate post-hike.

View of Mount Adams from the boulder field
Leave no trace
Of course, you’re going to need to follow the leave no trace principles to help protect Mount St. Helen’s fragile environment.
No dogs allowed
Keep Fido at home for this one — their paws wouldn’t handle the boulders made of pumice well anyways.
Toilets
Use pit toilets at the trailhead, near the Loowit Trail in the forest, or use a wag bag if needed. Pack out any toilet paper you use or get a pee funnel, or Kula Cloth.
Trail etiquette
With only 110 permits sold per day of the peak season, this hike isn’t too crowded. You won’t have the trail to yourself, but it’s easy to stay out of each other’s way. Yield to uphill hikers (especially on the ash field) and pull over to let faster hikers pass.

Where to stay
Lodging
Just 30 minutes away, Cougar, Washington is the closest town to the Climber’s Bivouac. Lodging options are minimal, but you’ll be able to find accommodations at the Lone Fir Resort. They offer hotel rooms, cabins, as well as tent and RV sites. Their café has the best food in town, although the Cougar Bar & Grill serves prime rib on Saturday (get there in the early evening before they run out!).
Campgrounds
There are plenty of options to camp and RV. Reserve a site at the Lone Fir Resort, the Cougar RV Park and Campground, or the Cougar Park Campground (tent only).
Dry camping
You’ll find dispersed camping near the Climber’s Bivouac, but the trailhead also has 14 first-come, first-served, tent sites amongst the trees.
We’ve slept in our car at the trailhead rather than pitching a tent. If you choose to do this, the best thing you can do is park slightly farther away from the trailhead. Park at the trailhead, and you’ll be woken up by mice running all over your car.
RV’s and travel trailers are allowed to park and dry camp at the Marble Mountain Sno-Park. Just bring a car to get seven miles up the road to the Climber’s Bivouac from there.

Trail snacks
You’ll want to snack about every hour or two on this hike to help keep your energy level steady. We bring about 10 snacks per person (it’s always a good idea to have extra food).
We love to snack on various protiens, such as trail mix, jerky, beef sticks, hard cheese and salami, as well as chicken or tuna packets with crackers. Luna, Lara, and Clif Bars also make good eats, as well as dried fruits, and salty items like parmesan chips.

Packing list
Items specific to this climb
The boulder field is made of pumice and is very rough on your hands. Bring a pair of gardening gloves to protect your hands. Your average pair of fuzzy winter gloves will work too, they’ll just snag a bit.
Gaiters
Gaiters are a must to keep the ash and small rocks out of your boots. We favor these gaiters because they are lightweight.
Emergency supplies
Don’t forget to add your own personal medications like inhalers or epi-pens.
One headlamp is needed for every member of your group.
For blister care
Use a bandaid from your first aid kit to cover the blister, then put Lekotape over the top of it to hold it in place
We love the peace of mind our Garmin inReach Mini gives us. With it, you’ll have the ability to set waypoints, text others when there is no cell service, and use the S.O.S button for emergencies.
There is a monthly subscription fee
Map of the area
Toiletries
Use this anywhere to prevent chafing.
Hydration
Water bladder
The HydraPak water bladders are the best we’ve tried.
We love that they’re fully reversible — makes cleaning them a breeze!
Salt pills (caffeinated/uncaffeinated)
We use these on the trail, starting at our first snack break, and continue to take one roughly every 45 minutes after.
The caffeinated ones provide a nice, but small, boost of energy.
Nuun (caffeinated/uncaffeinated)
We keep a tube of these in our car and use them after hiking to replenish electrolytes quickly.
They come in tablet form, so there are no messy powders or extra garbage.
If you’re feeling dehydrated the day after your hike, take another.
We use the caffeinated ones to help us stay awake if we have a long drive home after a big hike.
Clothing
Warm hat, gloves, and more layers if you’ll be hiking in the fall or before sunrise
Hiking gear
Daypack
Essential for going downhill


Search the blog for more adventures! Try searching for topics such as “hiking”, “waterfalls”, or “Mount Rainier”.